Monday, October 27, 2014

FTDI Bricking all the non genuine FTDI chips #26


FTDI are used for easy USB connections in microcontroller and are widely used.  FTDI updating drivers in windows machine for detecting the counterfeit Ics and then re writing their internal eeprom’s Product id to zero so that no machine can read the usb device again. They are bricking the chips and no use for  further.
FTDI been hitting their own market and all the users are real mad. Here’s the video on EEVLOG. https://www.youtube.com/watch?v=eU66as4Bbds


Friday, October 10, 2014

ENABLE LARGE CROSS HAIR IN ALTIUM DESIGNER #25

We have the default small cursor as

Then to change to large cursor or cross hair.


Step 1 :
Go to preferences. DXP -> Preferences or Tools -> Preferences


Step 2:
Navigate to PCB editor -> General.


Step 3:
Click on the drop down menu with small 90 chosen.


Step 4:
Choose large 90 and hit enter or OK.

Then its done.

Monday, September 29, 2014

CREATING 0805 SMD DESIGN IN SOLIDWORKS #24

Here's the previous part of the tutorial "http://shortedwire.blogspot.com/2014/09/creating-0805-smd-design-in-solidworks.html"
Now click on the features and extrude Boss /Base. Then enter the value 0.5mm.


Then the result likes


Now create a new part file and do same with dimensions 1.25mm x 0.35mm.


Save the file with "side" name.

Again create a new file and click on assembly this time.


Now click on insert component.


Now click and drag the component drag the side twice and body once and screen will be like.


Now click on the highlighted two faces and click on mates. 


Then the two faces will be collinear and like.


Similarly do same for all the faces which needs to collinear and finally results the 0805 package.


Finally save it as STEP 14 file and then import it to altium. 


Thursday, September 25, 2014

CREATING 0805 SMD DESIGN IN SOLIDWORKS #23

First start solid work click new and click new part.

Now hit OK.


Now click on SKETCH on top left corner.


Then click on front plane then sketch will start.


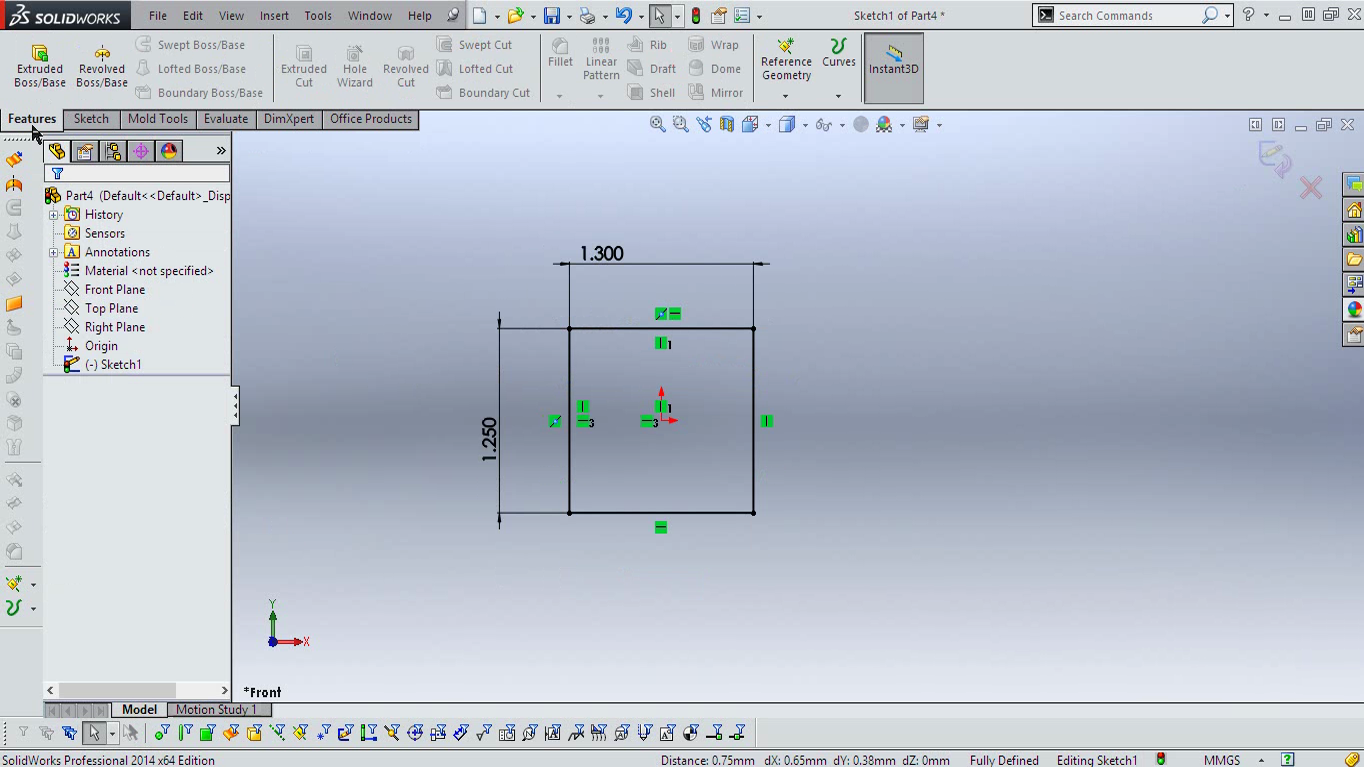
Click on rectangle tool. 


Then drag a rectangle


Now click on Smart Dimension from the toolbar. 


Click and drag the dimension from the rectangle


Enter Dimension 1.3 mm and hit enter


Do same for the other side but with 1.25mm dimension.
Then right click on the line as shown in the image below.


Then click on the select midpoint and holding down the control click on the origin. 


Then click on vertical. This will turn the vertical lines to black.(This is not cumpulsory step.)


Now do same for the vertical lines also and hit horizontal option and this will turn all rectangle to black color.


Now the rectangle is all done and i'll continue on the next post. 

Here' you get in end. 


Then at the very end and will be using it with Altium Designer 14


Wednesday, September 24, 2014

A SIMPLE DUAL POWER SUPPLY CIRCUIT #22

Dual power supplies are required mainly in signal purposes mainly in opamps and in amplifiers.
Amplifiers need high current supply and high voltages for delivering very high watt power to the speaker.
A very simple dual power supply can be make just using capacitor and resistor divider.


Here connecting B+ voltage will give output of +B/2 and - B/2 with respect to PGND on the terminal.
This circuit is used in SINGLE POWER SUPPLY CLASS D AMPLIFER of International Rectifiers' IR4301 and works real good.Here's the link of the IR's amplfier's circuit.
http://www.irf.com/technical-info/refdesigns/iraudamp17.pdf
Besides classical transformer based dual power supply will always works nice and fine.


Monday, September 22, 2014

CHEAPO ETHERNET FOR YOUR CONTROLLER #21

Enc28J60 is Microchips' cheap 28 pin 10BASE-T stand alone ethernet controller IC with both MAC and PHY. IC's available in DIP,SOIC,SSOP,QFN packages and quite popular in embedded designs.
Its interfaced to controller with SPI interface and has got 8K of Buffer RAM. Many breakouts are availabe for the board but why not build one of you own.
Things we need

J006d21BNL is RJ45 connector with internal transformers. These are available in digikey or any other supplier.
ENC28J60-I/SP is DIP package http://www.digikey.com/product-detail/en/ENC28J60-I%2FSP/ENC28J60-I%2FSP-ND/1680061

The whole schematics looks
The symbol here in C3 and in BOM above is mistaken for L3. The schematic for the capacitor should be inductor for value around 10 to 47 uH.

Here's a single layered home made PCB for the schematic.
With some nice 0805 100nF capacitor decouplings and SMD regulator below the board.
OOPs no 3d for connector..


Sunday, September 21, 2014

YOUR OWN USBasp PROGRAMMER #20

USBasp Programmer are used to program AVR microcontrollers. These programmers are used as ICSP (In Circuit Serial Programming). 
AVR's ISP header are generally in 10 pin format or in 6 pin format as in arduino.


The ISP pins are connected to the AVR's SPI pins and programming can only be done if SPI downloading is enabled and external reset pin is not disabled. 

USBasp can be used with some softwares like EXTREME AVR PROGMMER and even ARDUINO.
AVR dude also supports USBasp uploading.
USBasp firmware is readily available and it uses ATMEGA8 and used AVR's VUSB for making firmware only USB driver.


The PCB is like with USB B connector.


And some 0805 100nF decouplings below.
The usbasp firmware and circuit with drivers for PC are available from its site http://www.fischl.de/usbasp/